

How to Pick the Right Logo File Formats for Web and Print
Choosing the right logo file formats is crucial for your brand's online and offline presence. This guide walks you through each option and shows how Quicklogo can simplify the process.
Quicklogo Team
How to Pick the Right Logo File Formats for Web and Print
When you need a logo that looks crisp on everything from business cards to social media, the question isn’t just “PNG or SVG?”—it’s “What’s the best logo file format for each case?” You may have heard the dreaded question from a printer or developer: “Do you have a vector file?” Or maybe you’ve seen your logo appear blurry on Instagram. It all comes down to picking the right formats for the right situations.
In this blog post, you’ll learn a step-by-step process to decide which file type best suits your logo’s final destination—whether it’s a web banner or a printed brochure. We’ll guide you through a decision framework, complete with a handy checklist, so you can breeze through decisions on format, scalability, and more without needing a deep dive into design software. You’ll also see how Quicklogo can save you time by offering ready-to-use multi-format file packs, making sure you never have to worry about unexpected compatibility issues again. Let’s get started!
Understanding Logo File Formats: Vector vs Raster
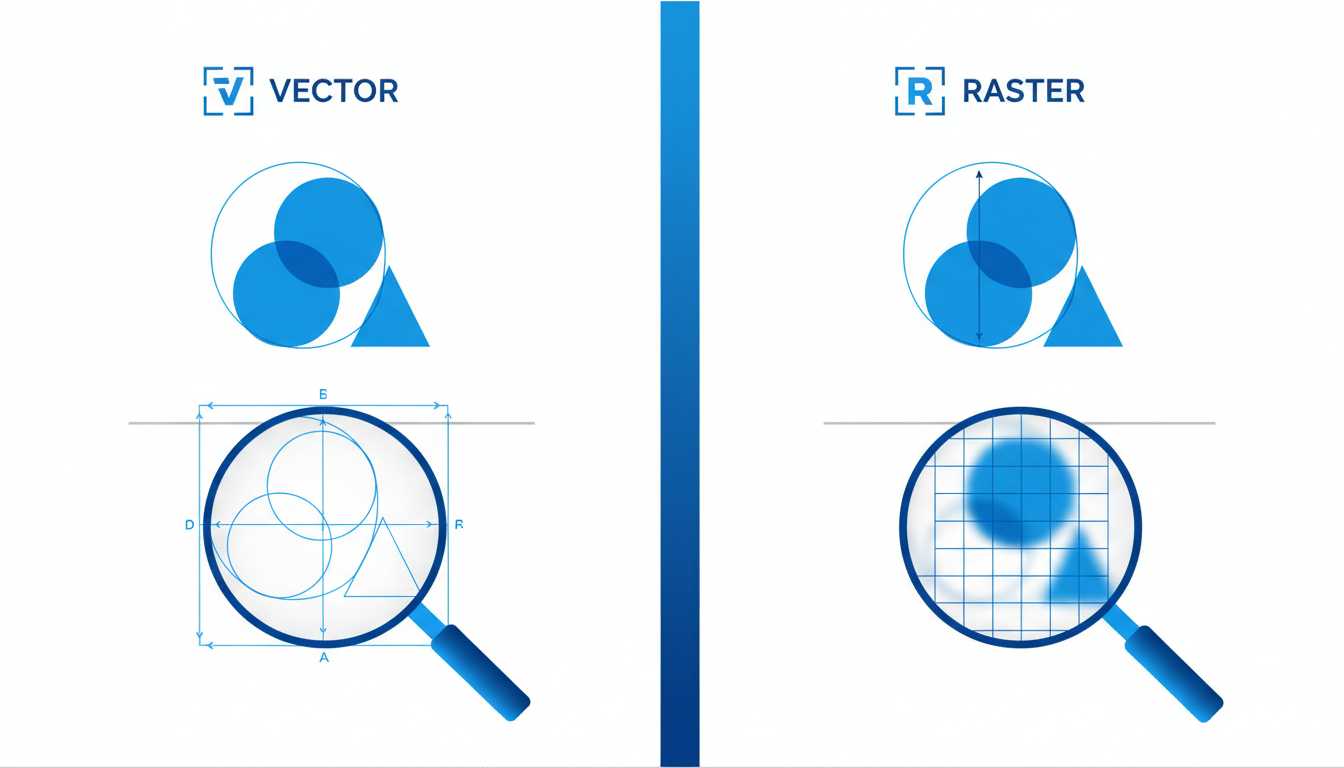
When it comes to selecting the right logo file format, understanding the difference between vector and raster images is crucial. This distinction determines how your logo will look and perform across various mediums.
Vector Images
Vector images are crafted using mathematical formulas, allowing them to scale infinitely without losing quality. Imagine a vector as a recipe—no matter how you adjust the proportions, the end result remains consistent and sharp. Common vector file formats include SVG and EPS. These files are ideal for logos because they can be resized for anything from a tiny business card to a massive billboard effortlessly. If you've ever heard a designer ask for a "vector file," this is why—they’re looking for this scalability and flexibility.
Key Insight: Vector files are essential for maintaining logo crispness on large prints and diverse digital platforms.
Raster Images
In contrast, raster images are composed of pixels. Think of them like a photograph; each pixel is a tiny square of color, and together, they create an image. However, enlarging a raster image can lead to blurriness because you're essentially stretching those pixels. Common formats include PNG, JPG, and GIF. Raster files are often used for web applications due to their small file size, especially JPG for images without a need for transparency and PNG for those requiring a transparent background.
Key Insight: Raster files are useful for web content and smaller applications but beware of scaling issues.
Scalability and Resolution
Scalability is the primary difference between vector and raster images. Vectors win when you need your logo to be scalable across varied platforms. In terms of resolution, raster images must be saved at a high resolution (usually 300 DPI for print) to ensure clarity. For vectors, resolution isn’t a concern due to their mathematical nature.
File Types Breakdown:
- SVG: Best for web use where scalability is necessary.
- EPS: Preferred for professional printing; maintains high quality.
- PNG: Ideal for digital use when transparency is required.
- JPG: Suitable for web use where file size matters more than transparency.
Understanding these differences not only empowers you to make informed decisions but also equips you to communicate effectively with printers or web developers about your logo needs.
Color Modes and Their Impact on Logo Files
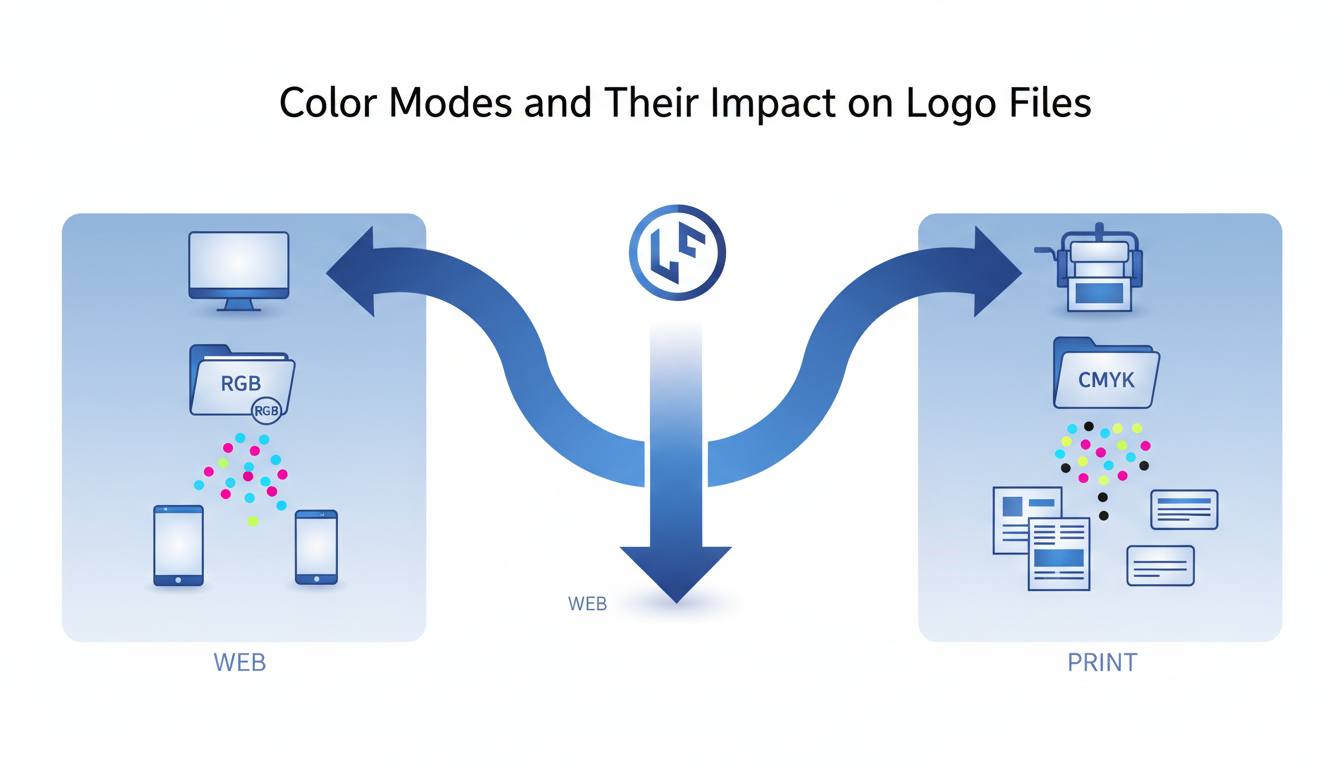
When you're working with logos, understanding color modes is crucial for ensuring your designs are clear and vibrant across different mediums. Let's break down the two primary color modes: CMYK and RGB, and how their applications can impact your logo's appearance.
CMYK stands for Cyan, Magenta, Yellow, and Key (Black). This color mode is used for print. It works by combining these four colors in varying degrees to produce other colors. When you're preparing a logo for printing—whether it's for business cards, brochures, or banners—CMYK is your go-to. Why? Because printers use these four inks to get the full spectrum of colors on paper. If you send a logo in RGB to a printer, the colors might not look as expected, resulting in a dull or inaccurate print.
On the other hand, RGB stands for Red, Green, and Blue. This mode is optimized for digital displays—think websites, social media, and digital ads. Screens emit light through these three colors, combining them to create the vibrant hues we see online. When you're exporting a logo for web use, RGB is the best choice to maintain brightness and saturation.
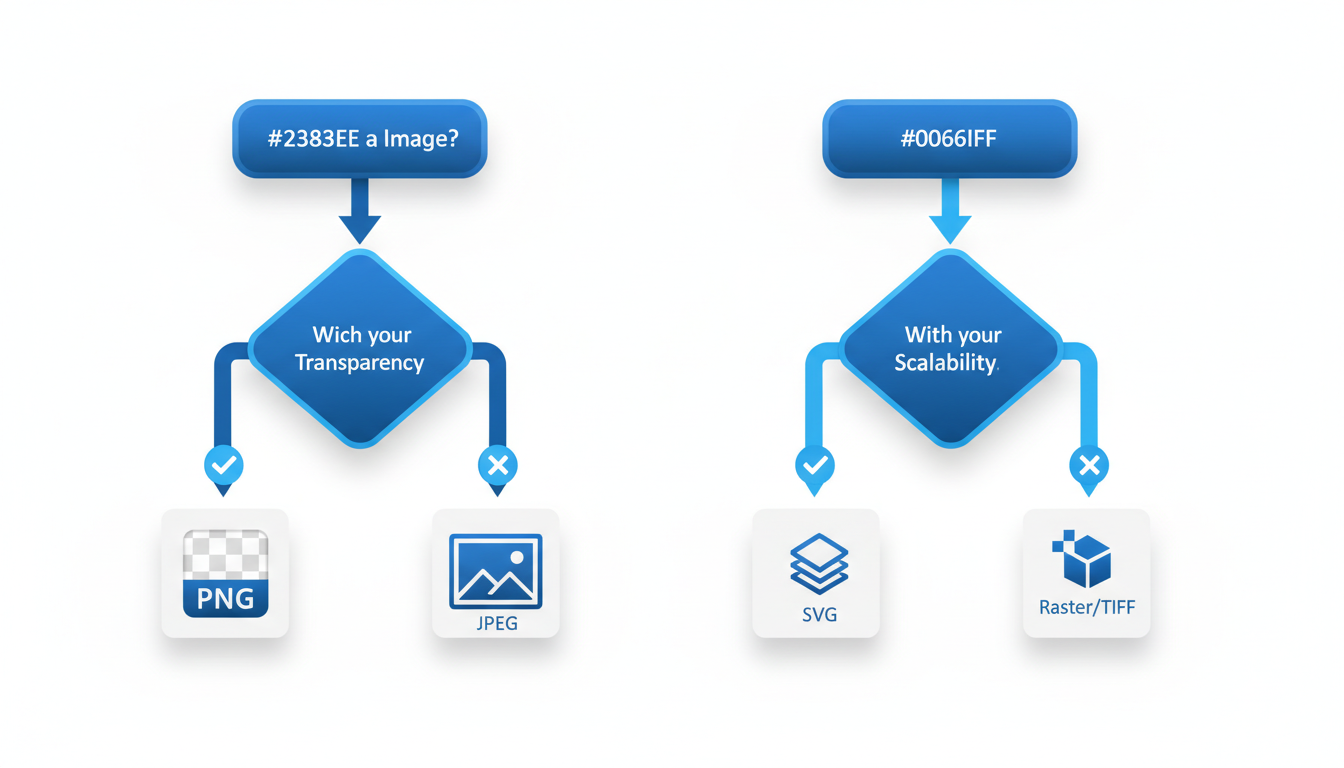
A pivotal aspect of logos in any medium is transparency. A transparent background logo is typically provided as a PNG (Portable Network Graphics) format. This is because the PNG format supports transparent backgrounds, unlike JPGs, which fill in the empty space with white. Transparency is crucial when you have a logo with a unique shape that must blend seamlessly over various backgrounds, such as on a website banner or a product image.
Expert Tip: Always verify your logo's color mode before sending files to a printer or uploading them online. A simple check can save you from ending up with unexpected results.
By strategically choosing the right color mode and understanding transparency, you ensure that your logo maintains its integrity, no matter where it's displayed. This knowledge not only simplifies your workflow but also boosts your confidence in presenting your brand professionally.
Flowchart: How to Choose the Best Logo File Format (Decision Guide)
When it comes to selecting the best logo file format, the decision hinges on understanding where your logo will live and the specific needs of that channel. Think of it like a map: start with the destination (web, social media, print), and then determine the requirements (scalability, transparency, file size, etc.).
Start with Your Use Case
Web Use:
- If your logo is primarily for your website or email signatures, you'll want a format that loads quickly and looks crisp.
- Formats to consider: SVG for scalability (great for different screen sizes), PNG for images with transparent backgrounds.
- Why? SVGs are vector-based and retain quality no matter the size, while PNGs are raster images, perfect for non-scalable use with transparency.
Social Media:
- Social platforms often require fast loading and various aspect ratios.
- Formats to consider: JPG for its smaller file size and quick loading, PNG for better quality with transparent backgrounds.
- Why? JPGs are ideal for photographs or detailed images, whereas PNGs maintain quality with transparency for logos.
Print:
- For print, you need high-resolution and color fidelity.
- Formats to consider: PDF and EPS are your top choices, both supporting the CMYK color mode required for professional printing.
- Why? These formats ensure that your logo doesn't lose quality when printed, supporting large scale without becoming pixelated.
Key Principles for Format Needs
- Scalability: Go vector with SVG or EPS. Vectors allow infinite scaling without losing quality — think of them like a recipe: no matter how big or small, they retain the essence.
- Transparency: Choose PNG for web or social if your logo needs a transparent background.
- Compatibility and File Size: JPGs offer universal compatibility and are typically smaller, beneficial for web use where speed matters.
- Resolution: For print, ensure your files are at least 300 DPI to maintain sharpness and detail.
Make the most of the features available, possibly with tools like Quicklogo that offer multi-format file delivery. By leveraging such tools, you can generate all necessary formats in one go — ensuring you're always ready, whether it's for a website, social upload, or printing business cards.
Logo File Formats for Web and Social Media
Navigating the best logo file formats for web and social media can be a little tricky, but don't worry — we're here to make it simple. Let's dive into what works best where, and why.
For web usage, SVG and PNG are your go-to formats. SVG, or Scalable Vector Graphics, is ideal for logos because it remains crisp and clear at any size. This is particularly useful for responsive web design, where logo size may change based on the device. SVG files are lightweight and load quickly, ensuring your web pages remain snappy, improving both user experience and SEO. Plus, they're naturally transparent, which means your logo can seamlessly fit over any background color without awkward borders.
Key takeaway: Use SVG files for logos on your website for crisp, scalable images that load swiftly.
Meanwhile, PNG is the perfect choice when you need a raster format. It's great for maintaining image quality with a transparent background, which is essential for various web applications where you might need to overlay your logo on different elements or colors. However, ensure you're using the appropriate resolution. For web headers, aim for at least 72 DPI (dots per inch) resolution, but remember that higher resolution can increase file size and loading times.
Common mistakes involve using JPG for web logos. JPG files don't support transparency, and they tend to compress the image, leading to a loss of sharpness. This can make your logo appear blurry, especially when scaled up or viewed on high-resolution screens.
For social media, PNG is again a favored format because platforms often display logos in a variety of sizes and sometimes over different backgrounds. Moreover, ensuring the proper size is crucial to avoid pixelation. Check each platform's recommended dimensions — Instagram, for instance, currently suggests a 110x110 pixel profile image.
By understanding these format basics, you'll avoid the frustration of seeing your logo look anything less than professional. After crafting your logo with Quicklogo, you can download these formats directly and ensure you're web-ready and social-smart.
Preparing Logo Files for Print
When it comes to printing your logo, choosing the right file format is crucial to ensure your brand looks professional on every medium, from business cards to banners. For printing, the best formats are EPS and PDF. These formats are widely accepted by printers because they maintain high quality at any size, thanks to their vector-based nature.
EPS (Encapsulated PostScript) is a favorite for professional printing. As a vector file, EPS ensures that your logo scales smoothly without losing detail, perfect for everything from small brochures to large-format posters. It also supports colors defined in the CMYK color mode, crucial for accurate color reproduction in print.
Similarly, PDF (Portable Document Format) is highly versatile and maintains image integrity. PDFs can include both vector and raster data, making them excellent for preserving the intricate details of your logo. When using PDF for printing, ensure it’s saved with the correct color settings (CMYK) and set at a high DPI (Dots Per Inch)—typically 300 DPI or higher. This ensures your logo remains sharp and vibrant, preventing pixelation or blurring during the print process.
Key Insight: Always confirm with your printer regarding preferred file formats and specific requirements. This proactive step avoids common pitfalls like resolution mismatches or color inconsistencies.
A common issue in printing is a mismatch in DPI. For crisp, clear prints, a minimum of 300 DPI is essential. Lower resolutions, like those typically used for web (72 DPI), result in pixelated and blurry logos.
Here’s how to avoid printing mishaps:
- Verify DPI and Resolution: Always check that your logo file is saved at the necessary resolution for print.
- Color Mode Settings: Ensure files are in CMYK rather than RGB, as this aligns with printing technology.
- Consult Your Printer: Different printers might have specific requirements, so confirming details like bleed areas and exact file needs is crucial.
By keeping these tips in mind and using EPS or PDF, you can ensure that your logo shines brightly and clearly across all printed materials. Quicklogo can help with generating these formats, streamlining the process and saving you time.
Special Logo Use Cases: Merchandise and App Icons
When it comes to merchandise and embroidery, there are specific requirements that make choosing the right logo file format crucial. For merchandise, a vector logo is essential. Vector files like SVG and EPS ensure your logo can be resized without losing quality, which is vital for printing on various merchandise such as t-shirts, mugs, and tote bags. These formats allow seamless scalability, ensuring your logo looks crisp whether it's on a small pen or a large banner. For embroidery, having a print-ready logo file in vector format is also necessary, as it needs to be converted into a stitch file by the embroidery machine. This conversion maintains the logo's integrity during the embroidery process.
For app icons, you need to focus on formats and resolutions that suit digital environments. While vectors aren't directly used for app icons, having a high-resolution raster image like a PNG ensures clarity on screens. PNGs support transparency, which is beneficial for icons that need to stand out against various background colors. You'll want icons that are clear and properly sized for different devices, ranging from smartphones to tablets. Testing your logo icon in different app store environments before finalizing is wise—each platform often has specific requirements.
Ensure your logo looks sharp in every use case by opting for the right file format. Vectors for merchandise and high-res PNGs for icons guarantee your brand stands out wherever it appears.
By understanding these special requirements, small businesses can avoid common pitfalls, such as logos appearing blurred on merchandise or icons looking awkward in app stores. Having the right assets from the start means you'll never have to scramble for last-minute fixes, allowing you to maintain consistent, professional branding across all channels.
Organizing Your Logo Files: Folder Structure and Naming Conventions
When it comes to logo file management, having a well-organized system can be a lifesaver for any small business. Here’s how to create a simple folder structure and naming conventions that will keep your brand assets easily accessible and comprehensible.
Start with a Broad Folder Structure:
Begin by establishing a primary folder labeled “Brand Assets” on your computer or cloud storage. Inside this folder, consider creating subfolders based on use cases, such as “Web,” “Print,” and “Social Media.” This categorization aligns with the decision framework for choosing the best logo file format depending on its application.
- Web: Include files like SVG and PNG, which support web use and scalability.
- Print: Stock up on PDFs and EPS files for high-resolution print outputs.
- Social Media: Opt for formats like PNG that include transparency for profile images and posts.
Implement Clear Naming Conventions:
Naming your files consistently is crucial for easy retrieval. Use descriptive and standardized names that detail the format, use case, and version. For example:
CompanyName-Logo-Web-2023.svgCompanyName-Logo-Print-2023.epsCompanyName-Logo-Social-Profile.png
This approach immediately clarifies the file’s purpose and saves you from sifting through ambiguously named documents.
Master File Concept:
Maintain a master file—a high-definition vector file of your logo in formats like AI (Adobe Illustrator) or EPS. This is your go-to source for creating new formats or making adjustments. Store it in a separate “Master Files” subfolder within the Brand Assets folder to ensure it’s easily locatable and secure.
"A well-structured folder system enhances efficiency, making sure your brand is represented consistently across all touchpoints."
By adopting this strategy, you'll not only streamline your logo file management but also fortify your brand’s visual identity. With organized assets, you’ll have more time to focus on what truly matters—growing your business.
Quicklogo in the Logo Export Workflow
Understanding how Quicklogo fits into your logo creation and export process can make life much easier. Quicklogo streamlines the steps of generating, customizing, and downloading your logo in multiple formats, ensuring you have exactly what you need for different applications.
Generate
At the heart of Quicklogo is its ability to generate multiple logo options in seconds. This rapid creation is ideal for entrepreneurs and small businesses that need a professional logo quickly. By leveraging AI trained on thousands of professional logos, Quicklogo offers diverse and tailored options that suit your brand perfectly.
Customize
Once you have generated your logo, Quicklogo allows you to customize it to match your brand's specific needs. This includes adjusting colors, styles, and other essential elements. Customization ensures that your logo aligns with your brand’s aesthetic without needing extensive design skills. The intuitive interface makes this process seamless, even for beginners.
Download
The real magic of Quicklogo lies in its multi-format file delivery. This feature ensures that you have the right files for every channel, from web to print. Quicklogo provides formats like SVG for scalability, PNG for transparent backgrounds, and PDF for print precision. These formats are crucial for maintaining visual consistency across different platforms and avoiding issues like blurriness or incompatibility.
By integrating Quicklogo into your workflow, you eliminate the guesswork in selecting the right file formats. This sets your brand up for success across all channels and helps prevent common mistakes. Quicklogo's comprehensive approach ensures that you can focus on growing your brand with the peace of mind that your logo needs are fully covered.
Takeaway: Quicklogo’s streamlined process of generate → customize → download positions it as an indispensable tool for small business owners, ensuring they receive a robust set of logo files ready for any application.
Final Checklist: Your Logo Export and Download Guide
Navigating the maze of logo file formats can be daunting, but it doesn't have to be! Here’s your step-by-step guide to exporting the right formats for every application, ensuring your brand shines across all platforms.
Step-by-Step Summary
At the heart of making your logo versatile is understanding its intended use. Consider where it will live (web, social media, print), whether it needs scalability (think: resizing for various applications), and if it requires a transparent background. Each decision aligns with specific file formats that cater to these needs, streamlining your workflow.
Download Checklist for All Channels
Here’s a handy checklist to ensure you've got all bases covered:
Web Use:
- SVG (Scalable Vector Graphics): Ideal for web due to scalability and small file size.
- PNG: For images with transparent backgrounds, perfect for overlays on websites.
- JPG: Use for non-transparent web needs, balancing quality and loading speed.
Print:
- EPS (Encapsulated PostScript): Preferred by print professionals for high-quality, scalable prints.
- PDF: For printer-ready logos, ensuring colors stay consistent.
- High-Resolution PNG: As a backup for situations requiring transparency.
Social Media:
- PNG: Ensures your logo retains transparency.
- JPG: Use if a smaller file size is essential.
Special Cases (Merch, Embroidery):
- EPS: Unmatched for scaling and detail retention in printing processes.
Handoff to Developers and Printers
Developers:
- Provide SVG files for websites to ensure scalability and crisp resolution across devices.
Printers:
- Supply EPS and PDF files. Confirm their preferences for color modes, typically CMYK for print.
Practical Storage Tips
Prevent lost files with a structured folder system:
- Main folder: Brand_Assets
- Subfolders: Web, Print, Social
- File Naming: Include format and use case, e.g.,
Logo_Web_SVG.svg
Expert Insight: Many businesses find that having a single "master file" in vector format (like SVG or EPS) can simplify future edits and exports.
Markdown Data Table
Here’s a quick reference to each file type’s use:
| Format | Use Case | Scalability | Transparency | File Size |
|---|---|---|---|---|
| SVG | Web | Yes | Yes | Small |
| PNG | Web/Social/Print Backup | No | Yes | Medium |
| JPG | Web/Social | No | No | Small |
| EPS | Yes | Yes | Large | |
| Yes | Sometimes | Medium-Large |
With this guide, your brand’s visuals will always look polished and professional, no matter where they appear. For a seamless logo creation and download process, consider using Quicklogo, where these exports can be easily configured for all your branding needs. For more detailed tips, check out Quicklogo’s guide.
Frequently Asked Questions
What is the best logo file format for printing?
EPS and PDF are generally the best formats because they support vector graphics, which scale without losing quality.
Why do web logos require specific formats?
Web logos often need PNG or SVG formats for scalability and transparency, ensuring they look crisp and maintain design integrity.
How can I ensure my logo looks good on social media?
Use high-resolution PNG files for sharpness on digital displays and ensure the aspect ratio fits the platform’s specifications.
What’s the difference between CMYK and RGB color modes for logos?
CMYK is used for print, allowing accurate color reproduction, while RGB is for digital screens, offering vibrant colors.
How can Quicklogo improve my file preparation process?
Quicklogo allows you to generate, customize, and download logos in multiple formats, streamlining the preparation for web and print.
Final Thoughts
Selecting the right logo file formats doesn't have to be daunting if you follow a clear decision framework. Here's a quick recap:
- Scalability: Use vector formats (like SVG) for logos that need resizing without losing quality.
- Resolution: Opt for high-resolution formats (like PNG) for print to ensure clarity.
- Color Modes: Choose RGB for digital use and CMYK for print to maintain color accuracy.
- Transparency Needs: Use PNG for online logos that require transparency.
- File Size Considerations: Balance quality and loading speed on the web by using optimized formats like JPEG.
To ensure seamless export, use this quick checklist:
- Verify the intended use (web or print).
- Adjust to the appropriate color mode (RGB or CMYK).
- Select a format based on transparency needs.
- Ensure the resolution matches the medium.
As you move forward, try generating and customizing your logo with Quicklogo. In just a few steps, you'll have the formats you need for any platform. Ready to get started? Check out Quicklogo or follow our detailed step-by-step guide.
Back to all posts